K8S集群安装(新手向-ubuntu版本)
修改注:删除了一些无用的踩坑和说明,优化调整了结构与版面环境部署准备四台虚拟机,安装ubuntu18.04版本配置网络环境以一台虚拟机为
修改注:删除了一些无用的踩坑和说明,优化调整了结构与版面
环境部署
准备四台虚拟机,安装ubuntu18.04版本
配置网络环境
以一台虚拟机为例,其他的等同
首先确定虚拟机的设置正确(一般初始化就是这样不需要改动)
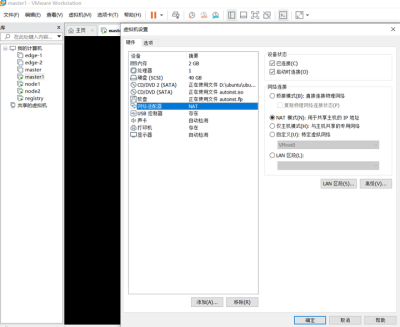
配置主机的NAT模式具体参数
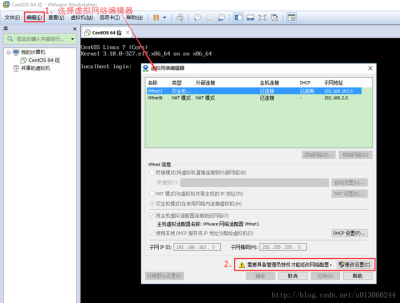
这里写图片描述
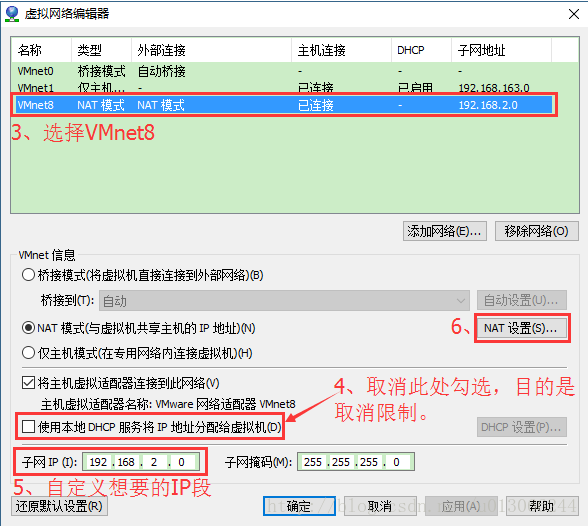
记住网关

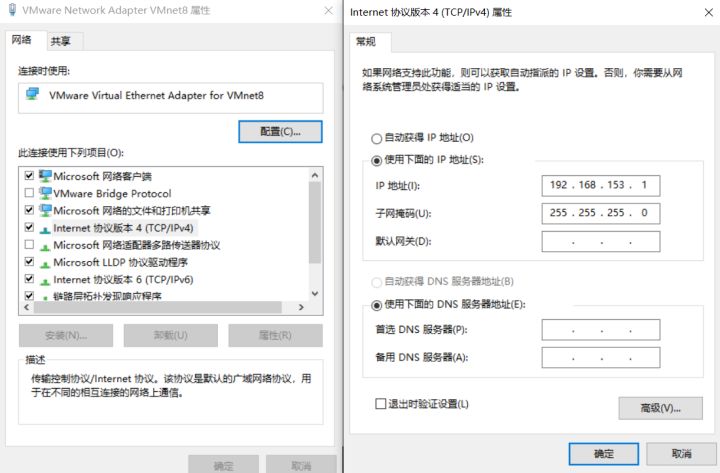
配置笔记本主机具体VMnet8本地地址参数:
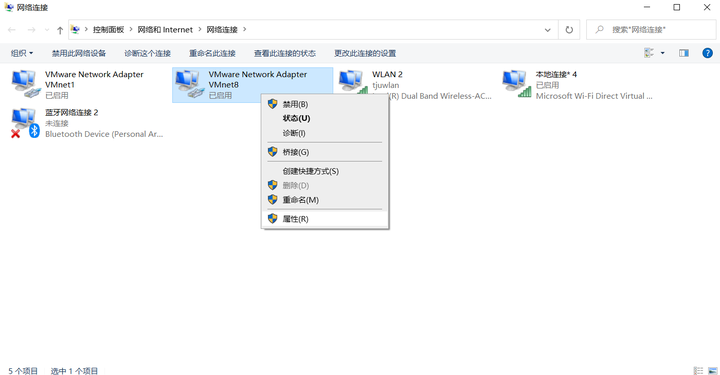
说明:下图中的IP地址随意设置,但是要保证不能跟你要设置虚拟机的固定IP一样。我设置的是:192.168.153.1
修改虚拟机中系统为固定ip的配置文件
虚拟机中启动命令行
sudo gedit /etc/netplan/01-network-manager-all.yaml
修改后为
# Let NetworkManager manage all devices on this systemnnetwork:n version: 2n renderer: NetworkManagern ethernets:n ens33: #配置的网卡名称,使用ifconfig -a查看得到n addresses: [192.168.153.101/24] #your ip for this vmn gateway4: 192.168.153.2 #the gateway set beforen nameservers:n addresses: [192.168.153.2]
有个我卡住的很憨很憨的坑,新手注意每个属性冒号:后要有一个空格。
执行命令
sudo netplan apply
查询Ip地址后应该可以看到修改后的ip
可以选做,能够提高运行效率:
ubuntu关闭图形用户界面
sudo systemctl set-default multi-user.target sudo reboot
ubuntu启用图形用户界面
sudo systemctl set-default graphical.target sudo reboot
K8S安装
- 安装docker
sudo apt-get install docker.io
为了不在每次使用docker时都用root用户,就改一下它的group,让平民也可以用。
sudo usermod -aG docker $USER
正式启用Docker:
sudo systemctl start dockernsudo systemctl enable docker
2. 安装curl
sudo apt-get updatensudo apt install -y curlnsudo curl https://mirrors.aliyun.com/kubernetes/apt/doc/apt-key.gpg | apt-key add
如果出现This command can only be used by root.的错误,就切换到根目录
su: Authentication failure问题:sudo passwd root
3. 添加安装源
sudo apt-add-repository "deb https://mirrors.aliyun.com/kubernetes/apt/ kubernetes-xenial main"n#安装k8s的重要组件nsudo apt-get install kubeadm kubelet kubectl -y
设置主机名hostname
sudo hostnamectl set-hostname HOSTNAME #(用master,node1,node2替换)
修改host文件
sudo gedit /etc/hosts
127.0.0.1tlocalhostn127.0.1.1tubuntu(改这里,改成master)nn# The following lines are desirable for IPv6 capable hostsn::1 ip6-localhost ip6-loopbacknfe00::0 ip6-localnetnff00::0 ip6-mcastprefixnff02::1 ip6-allnodesnff02::2 ip6-allrouters
sudo swapoff -a
初始化master
sudo kubeadm init --image-repository registry.aliyuncs.com/google_containers --kubernetes-version v1.19.3 --pod-network-cidr=192.168.153.101/24
把ip换成自己在master设置的静态ip地址
报以下错误就要把虚拟机配置修改一下
[ERROR NumCPU]: the number of available CPUs 1 is less than the required 2
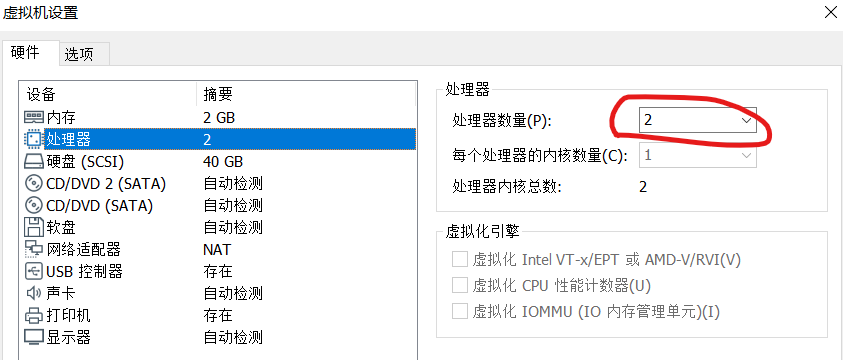
成功后
Your Kubernetes control-plane has initialized successfully!nnTo start using your cluster, you need to run the following as a regular user:nn mkdir -p $HOME/.kuben sudo cp -i /etc/kubernetes/admin.conf $HOME/.kube/confign sudo chown $(id -u):$(id -g) $HOME/.kube/confignnYou should now deploy a pod network to the cluster.nRun "kubectl apply -f [podnetwork].yaml" with one of the options listed at:n https://kubernetes.io/docs/concepts/cluster-administration/addons/nnThen you can join any number of worker nodes by running the following on each as root:nnkubeadm join 192.168.153.101:6443 --token 51tl72.gt63iey7eq5xe8y8 n --discovery-token-ca-cert-hash sha256:98a23691705d7a0d02589fdd05c5254ea5fe255e5b5084ff67ef386659bf640b
然后仅在master做下面的操作:
mkdir -p $HOME/.kubensudo cp -i /etc/kubernetes/admin.conf $HOME/.kube/confignsudo chown $(id -u):$(id -g) $HOME/.kube/confignnkubectl apply -f https://raw.githubusercontent.com/coreos/flannel/master/Documentation/kube-flannel.yml
接下来仅在每个node上做下面的操作,即复制上个图片里的最后一行:
sudo kubeadm join 192.168.153.101:6443 --token rqhtn1.1e4cbbc6dg85krye n --discovery-token-ca-cert-hash sha256:e89f384ffda27cbed75a6c1d7975061b5232e472370ec4ce304fc7032b3e0234
成功

遇到的一些坑:
node节点中遇到以下问题时:
- Unfortunately, an error has occurred:
timed out waiting for the condition

下面的方法没用
swapoff -a # will turn off the swapnkubeadm resetnsystemctl daemon-reloadnsystemctl restart kubeletniptables -F && iptables -t nat -F && iptables -t mangle -F && iptables -X # will reset iptables
解决方案:
重新安装系统。。。注意步骤是否出错。
最后在master中,查看部署状态:
kubectl get nodes
多等一会。。。。。很无语,找了半天方法解决notready的问题,结果过了一会自己好了。

2. 出现了以上的错误之后,尝试以下方法//:
重启。

好了。。。。。。乌鸡鲅鱼
最后注释一下重启系统后应该输的命令:
sudo -inswapoff -anexitnstrace -eopenat kubectl version
还有就是有个问题。。。虚拟机非常卡,非常非常卡,这是正常的吗(衰
